
Letting a property can become risky business without putting in proper safeguards. However, when a landlord chooses a good letting agent to manage their property or takes the time to do their research the risk can be drastically reduced.
There’s plenty of options available on the market for a landlord to safeguard their property. Some examples of these safeguards are:
- Landlord Insurance
- An experienced property management company
- Tenant referencing
- Mid term inspections
- Inventory reports
- An experienced inventory clerk
In this guide, we’re taking an in depth look at one of these safeguards. An Experienced inventory clerk.
What is an Inventory Clerk?
Property inventory clerks receive professional training in creating detailed inspections of rented properties. They receive their training from the AIIC (Association Of Independent Inventory Clerks) or in our case, the AIP (Approved Inventory Professional).
The inventory clerk is an independent body who inspects the property’s condition & cleanliness. Most importantly, an inventory clerk is completely impartial to the tenant and the landlord. This ensures a fair and unbiased inspection takes place.
What an Inventory Clerk does before an inspection
Before the inventory clerk visits the property to carry out an inspection they will do the following:
- The clerk or inventory company will talk with the landlord or letting agent. This will make sure that they arrive at the best time for the inspection to go ahead and when’s best to collect the keys. The clerk will also ask who the keys should be given to after the inspection has been completed. Lastly, the landlord or letting agent will also have an opportunity to make the clerk aware of any key areas of interest.
- The clerk or inventory company will also request a copy of the previous inspection completed at the property. However, if they already have this report they’ll check if it’s the most up to date version.
- Using the previous report, the clerk will familiarise themselves with the property before visiting.
What an Inventory Clerk does during the property inspection
When the day of the inspection arrives, it’s now time for the clerk to visit the property to carry out the inspection.
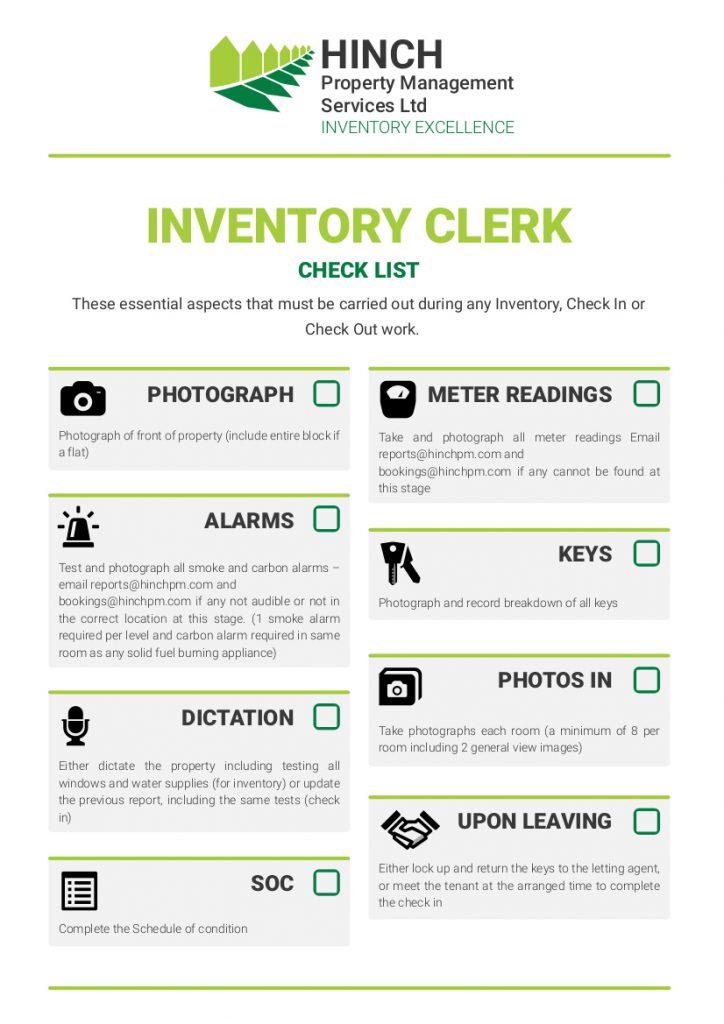
On arrival
- The inventory clerk captures a photo of the front of the property. If they are visiting a flat, they’ll capture a photo of the entire block.
- Now, the clerk tests all the alarms in the property. Testing the alarms at the start is very important. This allows the clerk to make the letting agent or landlord aware as soon as possible. Therefore giving the agent or landlord a chance to remedy the problem. This prevents the tenancy having to be delayed from going ahead.
- Moving on, the clerk collects the meter readings at the property. This is completed at the start in case any assistance from the landlord or agent is needed to find them.
The Property Inspection
- On completing these checks, the clerk moves on to dictating the properties cleanliness and condition.
- Walking through the property, the clerk verbally describes what they can see. The verbal description for every aspect of the property will include the material, colour, condition and cleanliness of each item. The following will be included, but is not limited to:
- Doors
- Walls
- Floor
- Ceiling
- Fixtures
- Fittings
- Windows
- Furniture
- White goods
- Outside spaces
- In addition to dictating throughout the property, the clerk also tests items in the property such as:
- Handles
- Locks
- Keys
- Gates
- Blinds
- Curtains
- Windows
- Doorbells
- Lights (interior and exterior)
- Pop up plugs
- Taps
- Flushes
- After the clerk has dictated the entire property, it’s now time to photograph their findings. By photographing their findings after the dictation gives the clerk a 2nd look around the property. This is a great way to ensure nothing has been missed.
- The captured photographs support the findings in the verbal description. The photos you can expect to be captured are:
- 2 General overview shots of every room or area in the property
- Photographs of individual items, furniture, fixtures and fittings
- White goods
- Cupboards and their interiors
- Electronic items
- Alarms
- Meter readings
- Outside areas
- Communal Hallways leading to the entrance
- Cleanliness issues
- The clerk takes photographs of all the dilapidations and damage in the property. A ruler or item such as a pen is used for scale reference if it’s required.
Finishing the inspection
Towards the end of the inspection, the clerk starts writing up a schedule of condition. Above all, the schedule of condition is a condensed summary of the clerks findings. In fact, this document is the most popular part of the report due to the fast overview the property manager or landlord receives.
Learn more about a schedule of condition here
There are two scenarios which can happen at the end of the inspection:
- A) The clerk now meets the tenants who are moving into the property. The clerk takes the tenants around the property. Here, any areas of interest in their findings are pointed out. In addition, the clerk also expresses their findings so the tenants are confident everything has been fairly documented. Using the schedule of condition, the tenants sign that they agree with the condition and cleanliness of the property. The keys are handed over to the tenant allowing them to settle into their new home.
- B) If the inspection being carried out is an inventory or check out, there will be no tenants coming to the property. Here the clerk locks up the property securely and leaves the property. They then drop the keys off back to the letting agent or landlord.
After the inspection
All the findings are typed up, and referenced to the photographs which feature the written finding. A complete online photo library is also created. Therefore, the agent or landlord access to full resolution photos.
However, now we find clerks using inventory software such as LetsInspect. Or in our case, our clerks are using a bespoke application we developed.
The Inventory Clerk Process Checklist (Downloadable PDF included)